2: Setting Up Your Project
Now that you have established contact between the Mosaic IDE Plus™ integrated development environment and your embedded controller, let’s examine the IDE Plus in more detail. One of the core features of the Codeblocks-based IDE Plus is the ability to manage a software development effort as a "project", and to manage a collection of projects as a "workspace". Each project specifies all of the configuration options and input files and resources needed to generate the completed application program. This section defines the key terms and describes how to use projects and workspaces to simplify the software design process.
Terms and concepts
This document assumes that you have an understanding of C programming techniques and terminology. Here are some additional concepts and definitions that provide the foundation for the Mosaic IDE environment.
Projects
A project is a bundle of settings and references to source code files and other resource files. Projects control the IDE Plus’s build process. The minimal project has one source file. When this project is built, the source file will be compiled together with any system libraries it references to produce an output target. Larger projects can contain many source code files in addition to resource files such as graphics for use with controllers that contain graphical user interfaces.
Compiling
Compiling your project is as simple as clicking Build→ Build. At compile time the Mosaic IDE Plus invokes the GNU Make tool in the GCC compiler tool chain. Make is aware of the last time and date that each source file was modified, and can compile projects in two different modes. Simply clicking Build→ Build instructs Make to compile each .C file only if it has changed since the last make. However, clicking Build→ Clean & Rebuild causes Make to start from scratch, compiling each and every .C file in your project. When GNU Make runs, it invokes the C compiler, linker, and other programs in the tool chain to produce the download file (.DLF) , which you can send via the Terminal to program your Mosaic controller.
Objects
When a C file is compiled, an object is produced. The object file is not directly usable by the controller, but it does contain the compiled, assembled version of the corresponding source file. After all the C source files are compiled into objects, they must be linked together to form the final output from the C tools called the elf binary. See Table 4-1 in the PDQ User Guide for more file extension information.
Managing projects
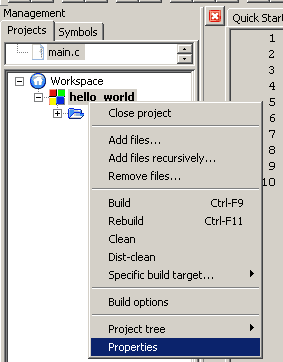
Projects are a powerful organizational tool for managing software development using the Mosaic IDE Plus. Projects save settings such as library paths, source files, and whether to set the "autostart vector" in the Mosaic controller. After creating your initial "hello world" program, you can examine your project in more detail by right clicking on your project in the management pane. Do it now so that you can follow along as we review the configuration menus. Right click there to see the context menu for projects. Select "Properties" to set the properties for your project as illustrated in Figure 1 .
Project properties
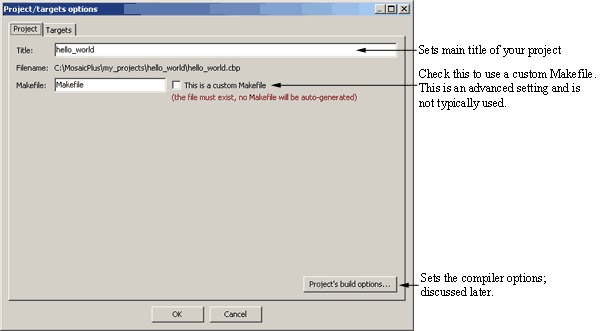
When you click on the "Properties" menu item shown in Figure 1 , the dialog box shown in Figure 2 appears. The top line of this dialog box announces the project title. This title is not the name of the download file, but rather the overall name you assign to the project. It is the name that will appear in the management window, but has no effect elsewhere.
The next line of the dialog box announces the project filename. The name of this file comprises the project name (hello_world in this case) with the .cbp extension. This is the Codeblocks project file itself. It uses the xml format, so it is editable and viewable using a standard text editor, however editing these files by hand should never be necessary and may result in your project not being loadable.
The third line of the dialog box in Figure 2 is the name of the makefile. We recommend that you leave this setting unchanged.
The button labeled "Project’s build options" leads to the compiler options dialog box which is discussed later.
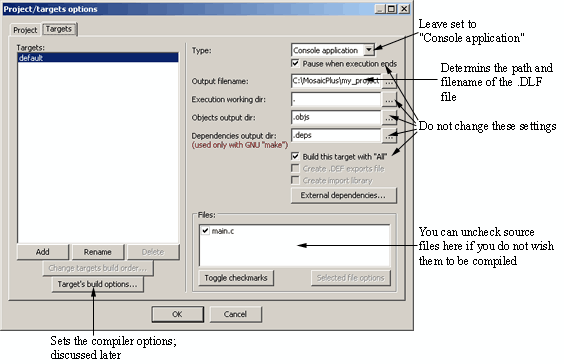
Clicking on the "Targets" tab in the Projects/targets options dialog of Figure 2 brings up the dialog box shown in Figure 3 for the default target. The "Output filename" option determines the name of the generated .DLF file. Most of the options on this page should be left alone.
Adding and removing files from projects
Adding files to a project in the Moasic IDE Plus is as simple as clicking Project→ Add files… Added files will automatically be compiled when the project is built. If .C source files are added, they go inside the "Sources" category in the Management pane while .H files go in the "Headers" category. Files of an unknown type are grouped in the "Others" category.
#include for a .C source file and the "Add Files…" method. It is tempting to simply #include all additional source files. This is not recommended.#include should only be used for header files!The build process used by the Mosaic IDE Plus allocates your program and any libraries into memory on a per-object basis. A single compiled object cannot be split across two memory pages; each memory page is 16 Kbytes. Thus all compiled objects must be smaller than a page. Using the #include directive to include many .C source files will make a large object that will quickly expand beyond the boundary of a page and generate a memory error. This problem is avoided when source code files are Added.
When C files are added to a project using the recommended "Add files…" menu, Mosaic IDE Plus keeps track of the files and compiles them when needed. The compiler does its best to ensure that the added files are grouped into objects that are smaller than one memory page.
One of the most powerful design features of C is the ability to have multiple source code files individually compiled into separate objects and then linked together in the end. On larger projects, rebuilding the entire project may take a long time, and recompiling only the objects whose sources have been updated minimizes compile time.
To remove a source file from a project simply right click on the file in the Management pane and choose "Remove file from project". Note that this will not delete the file from your hard disk.
Using multiple files
Employing the correct file conventions will minimize problems in projects that use multiple source code files. First, a .H file must never define an object that allocates memory space. This means that there should not be any variable or function definitions inside the .H file. Instead, use external variables and forward declarations of functions. Macro, struct and typedef declarations are also allowed in .H files. The following "simple.h" file provides an example of correct file usage:
#ifndef SIMPLE_H
#define SIMPLE_H
extern int global_int;
extern float global_float;

void display( void );  //forward declaration
#endif
The first two lines and the last line all begin with #. These three lines make up a preprocessor construct which allows this .H file to be included more than once without causing redundant definitions to be compiled. The corresponding "simple.c" file defines the variables and the function referenced in the .H file. The contents of simple.c are as follows:
#include "simple.h"
int global_int;
float global_float;

void display( void )
{
    printf("int is: %d\nfloat is %g.\n", global_int, global_float);
}
Each variable in the .C file has a corresponding extern in the .H file. Each function in the .C file has a forward declaration in the .H file. To include this code in a project, simple.c and simple.h would be added to the project using "Add files".
In summary, each source code file that accesses the variable, function, macro, typedef and struct symbols referenced in a given .H file must #include the header file so that these symbols will be recognized by the compiler.
Workspaces
The Mosaic IDE Plus uses the workspace concept becoming increasingly popular in modern IDEs. The workspace allows you to have more than one project open at once, and you can have any source files you like open in the editor simultaneously. All open files plus all configuration settings can be saved and restored together as a workspace. This powerful feature lets you switch among multiple programming efforts that might involve multiple projects. You can also instruct the Mosaic IDE Plus to build all projects that are currently loaded using the ‘Build Workspace’ command from the ‘Build’ dropdown menu. See the Methods for Building Your Project section for more details.
When working with multiple projects, only one project is considered to be "active" at any given time. The active project is denoted by bold lettering in the management pane. When you choose Build→ Build, only the active project is compiled. To activate a project, simply right click on its name in the management pane, and choose "Activate project". See Figure 4 for further explanation.
Configuration settings
There are countless options and flags that can be passed to the C compiler and related tools. Many are rarely necessary, and many others have predetermined values based on the overall type of project you are compiling. Configuration dialog boxes within the Mosaic IDE Plus provide a straightforward interface to the plethora of configuration possibilities of the GNU C compiler (GCC) tools and of the IDE itself. Detailed information about the commands available to GCC and other low level tools is available in the specific tool’s documentation, available here.
The Settings menu of the main IDE window provides access to the editor’s own settings, and the "Global Compiler Options". These options may be referred to as the build settings as they effect more than just the compiler. This should not be confused with a very similar dialog box called "Project Compiler Options." There are also some configuration options for plugins that may be accessed from the Settings menu. These plugins are not directly related to building output for Mosaic controllers but enhance your experience in the IDE.
These configuration option groups are described below.
Global versus project build settings
The compiler options that the Mosaic IDE Plus manages can be divided into two categories: global and project. Per-project configuration options are saved with your other project settings in your IDE Plus project file (.cbp). Global options are stored in the windows registry and apply to all projects.
Many build options are both global and per-project. To access the global configuration options, select Build→ Global compiler options. There is little reason to change most settings, and there are many subtle interactions between the various configurable options. The most likely settings you would want to modify are those in the "Embedded Settings" tab. Settings changed in this dialog box become defaults.
To change settings for a specific project, select Project→ Project compiler options. Most of the options here are the same as the Global compiler options, however not all settings are available from both dialogs.
Each section below discusses each configuration tab in the build options as accessed by the Project→ Project compiler options menu item. Each section indicates whether the tab appears in the global, project, or both build settings areas.
Embedded settings tab [project and global]
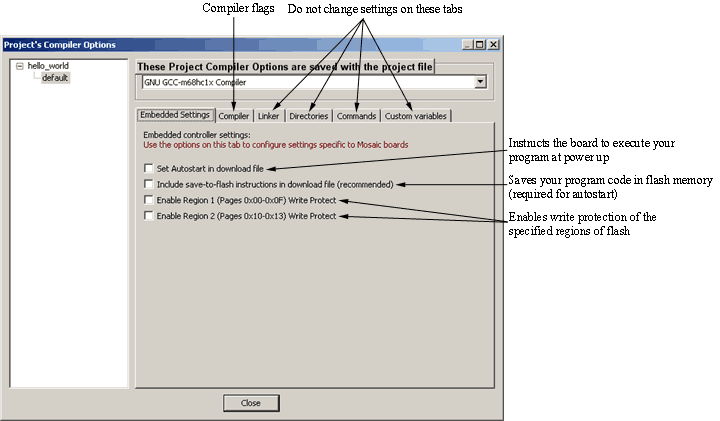
The Embedded Settings tab of the Project→ Project compiler options or Build→ Global compiler options menu is shown in Figure 5. This allows the configuration of program autostart and write protection settings.
Setting the Autostart vector
In most production systems, it is desired that the application program "autostart" immediately after power-up. The "Set Autostart in target" checkbox controls whether or not the download file includes instructions that set the autostart in the Mosaic controller.
Save to flash
This option saves your program code to flash memory. This makes your program non-volatile because it is not lost when the board loses power. This option is required if you want to use the Autostart Vector on your board.
Write protection
The Mosaic PDQ architecture offers two regions of memory that can be write protected. This feature is often useful in high reliability applications. Checking the boxes labeled "Enable Region 1 (Pages 0x00-0x0F) Write Protect" and "Enable Region 2 (Pages 0x10-0x13) Write Protect" in Figure 5 enables write protection of the specified region and memory range. Special instructions inserted into the download file control this feature.
Compiler tab [project and global]
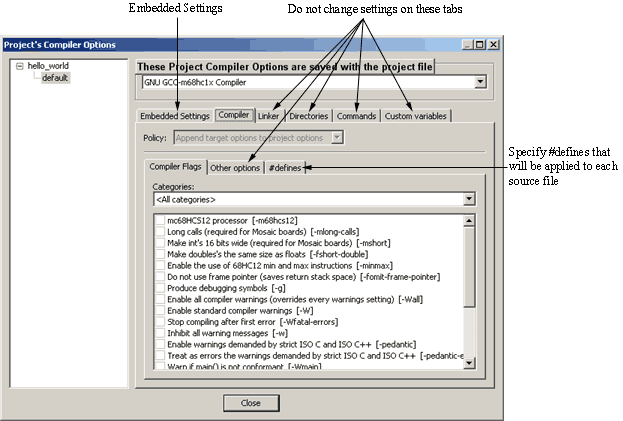
The Compiler tab of the Project→ Project compiler options or Build→ Global compiler options menu is shown in Figure 6. This page offers control over the behavior of the GCC compiler. Only experts should attempt to change these settings. Reference the GCC documentation for details on the command line arguments available. Note that none of the options are checked. If you view this same menu through Build→ Global compiler options you will see the default values. See the figure below for further explanation of the compiler options.
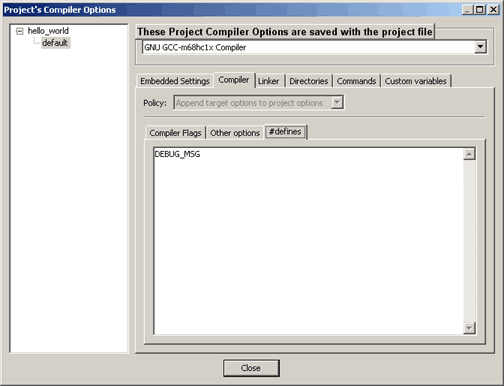
Note that if you click the tab "#defines" you will be taken to the dialog in Figure 7. In this screen shot the line "DEBUG_MSG" has been added. This is the same as placing:
#define DEBUG_MSG
at the top of main.c. Using this dialog to set #defined variables can be useful, as they apply to every source file. Variables should be placed in the box, one per line. To make use of this specific #define, you can put something similar to this in your source code:
#ifdef DEBUG_MSG
  printf("Debugging messages enabled\n");
#endif
Unused options
There are a few tabs marked "do not change settings on these tabs" on the figures above. We recommend that you do not modify these settings because the default values are required for proper operation of the Mosaic IDE Plus. Settings on the following tabs should not be changed:
- Linker Tab
- Directories Tab
- Commands Tab
- Custom variables Tab
- Programs Tab
- Other Tab
If you have any questions about these settings, please contact Mosaic Industries.
Methods for building your project
Building your project converts your source code file(s) into a download file that can run on the Mosaic controller hardware. We’ve described the most direct approach to building a project in the ‘Hello World’ section above. Now, we will take a closer look at all of the build methods.
We use the term build to distinguish the process from compiling. Compilation is something that, in strict terms, happens to a single source code file. When a project is built, each source file in the project is compiled to produce an object, and then all objects are linked together to form the executable from which the download file (.dlf) derives.
Large projects may have many input source code files. As described earlier, it is best to add each source file to the project using the "Add files…" menu item so that each file will be compiled individually. The alternative of #including a source file doesn’t result in separate objects at all, but rather causes then #included source code file to be compiled with the source code file that #included it. When projects are organized into many source code files, GNU Make does it best to ensure that no memory page overruns occur, and it also monitors the date and time of each source file and its object so that only objects whose source files have changed are compiled. When working with larger programs, this optimization saves a great deal of time.
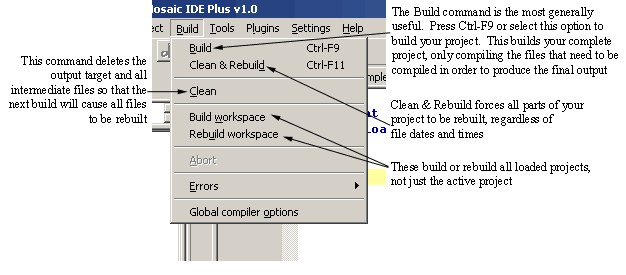
The options for building your project are in the ‘Build’ drop-down menu of the IDE; these include Build, Clean & Rebuild, Clean, Build Workspace, and Rebuild Workspace. You may find it useful to learn the shortcut keys for the more commonly used build commands, Build (Ctrl-F9) and Rebuild (Ctrl-F11). Figure 8 describes the choices in the build menu.
See also → 3: Coding Your Application

