WiFi Access Point Configuration
The WiFi Wildcard™ is ideal for web-enabled instrumentation and automation applications, enabling wireless connectivity using the Ethernet TCP/IP serial communication protocol. It implements a wireless interface that enables communications between your instrument and other computers or wireless access points via a Wireless Local Area Network (WLAN) using the standard 802.11b/g packet-based protocol. It is based on the Lantronix WiPort Wifi server device. This page describes how to configure and verify communications between the WiFi Wildcard and the wireless router in your WLAN.
WiFi access point configuration
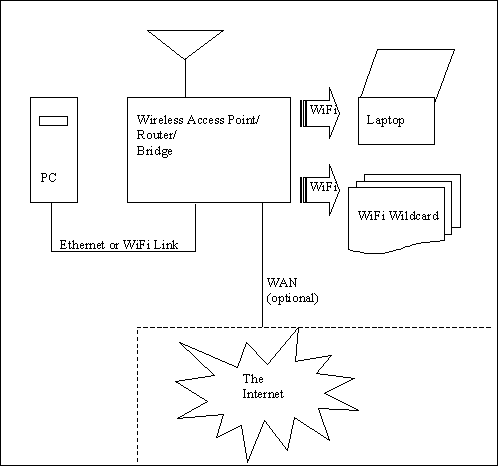
Figure 1-3 shows a typical wireless networking setup. At the center of the diagram is a wireless access point (AP), also known as a wireless router or bridge. At the left of the diagram is "your" PC, which may be connected to the access point via Ethernet or WiFi. A wireless antenna icon is shown on the access point, with wireless connections to a laptop computer and to the WiFi Wildcard. An optional Ethernet connection from the access point to a WAN (Wide Area Network) with full Internet access is also shown.
Figure 1-3 Diagram of a typical Wireless Local Area Network (WLAN).
The access point routes network traffic between your PC, the wireless devices such as laptops and the WiFi Wildcard(s), and the optional Internet connection. It is also called a "bridge" because it bridges the PC’s network to one or more additional networks, including the WiFi W-LAN (Wireless Local Area Network). The access point also contains a DHCP (Dynamic Host Configuration Protocol) server that automatically hands out IP addresses. This is typically how the WiFi Wildcard obtains its IP address.
The wireless access point must of course be configured to operate properly within your network. This section describes how to configure a prototypical access point.
Modern access points include an embedded web server that publishes a configuration web site so you can configure the access point via your PC’s browser. In this section we discuss the configuration process for a Netgear Wireless Router (Model WGR614 v4). While your access point may be different, the basic principles discussed here should guide your configuration process. In all cases, be sure to discuss the network configuration issues with your organization’s network system administrator.
Printed on the bottom of the Netgear access point are the following key pieces of information:
DEFAULT ACCESS:
http://192.168.0.1
user name: admin
password: password
To configure the access point, connect it to your PC using a standard Ethernet cable. (It is also possible to connect the access point to your PC using wireless, but this approach is not discussed here). Make sure the access point is powered up, then open your browser, and type into the browser address bar:
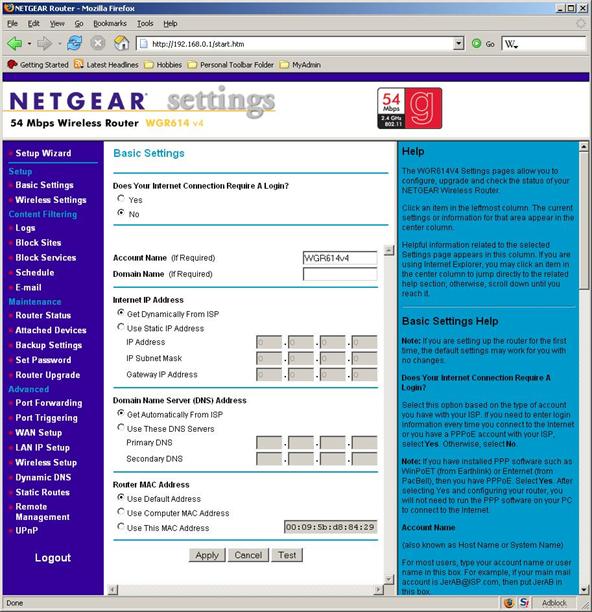
Type the user name and password into the login box that appears; "admin" and "password" are the defaults in this case. A configuration screen should appear in your browser window. The Netgear home configuration page is shown in Figure 1 4. The available configuration pages are listed in the left hand column. The right hand column presents excerpts from the help files of the router to guide your selections. The "basic settings" displayed in the center of the home page are the default values for the access point. These settings are relevant if the wireless access point is connected directly to the Internet via an ISP (Internet Service Provider). The defaults configure the access point to get its Internet IP and name automatically, and do no harm if the access point is not directly connected to the Internet via an ISP. In this discussion, we’ll assume that the wireless access point is not the main gateway to the Internet.
Figure 1-4 Home page of the wireless access point configuration site.
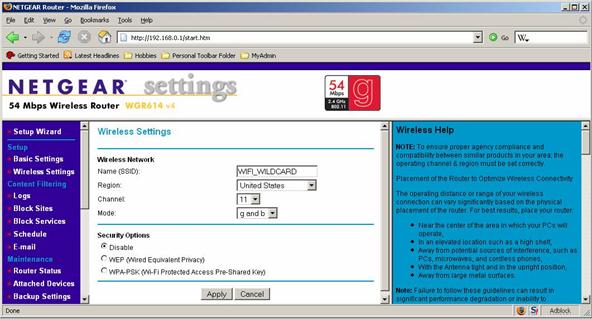
In the left-hand column of Figure 1-4, we click on "Wireless Settings" (the second item in the "Setup" section). This brings up the wireless settings configuration page illustrated in Figure 1 5. The first box in this page is very important: it is the SSID (Service Set IDentifier) of the Wireless Local Area Network (WLAN). The SSID must be shared by all of the devices on the WLAN in order for communications to occur. SSID’s are case sensitive. The default SSID for the WiFi Wildcard is:
WIFI_WILDCARD
Note that this SSID has been typed into the "Name (SSID)" field in the wireless settings page of the access point configuration site as shown in Figure 1 5. Typing in this SSID and clicking the "Apply" button at the bottom of the screen configures the wireless access point to use this SSID which enables communications with the WiFi Wildcard. You can also change the SSID of the WiFi Wildcard as explained in the section titled "WiFi Wildcard Configuration". Make sure that the SSID of the Wildcard matches the SSID in the "Name (SSID)" field of the access point configuration page shown in Figure 1 5, and that the SSID of any other devices on the WLAN are set to match the chosen SSID name.
The remaining fields in Figure 1 5 specify the region (United States), default channel (11), and WiFi mode (b/g). The b/g mode specifies the 802.11b/g WiFi protocol, which is the one supported by the WiFi Wildcard and most current WiFi devices.
The "Security Options" section in Figure 1 5 has the "Disable" button selected. Like the SSID, the security settings of the wireless access point must match the settings of all of the wireless devices on the WLAN. Wireless security is disabled by default on the WiFi Wildcard, so selecting the "Disable" button in the Security Options as shown in Figure 1 5 allows communications between the wireless access point and the WiFi Wildcard. You can change the security settings of the WiFi Wildcard as explained in the section titled "The WiFi_Security Function". Make sure that the security settings of the Wildcard match those of the access point and any other devices on the WLAN.
Figure 1-5 Wireless settings page of the access point configuration site.
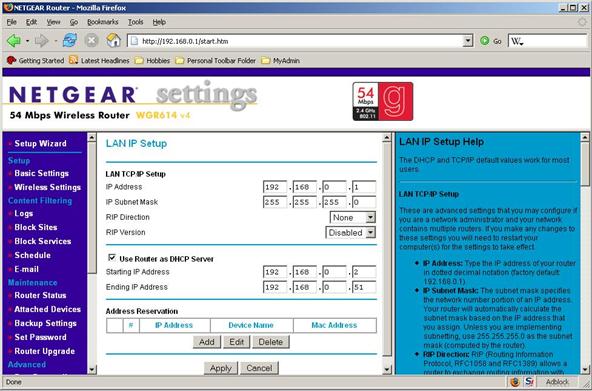
We can complete the setup of the wireless access point by clicking on the "LAN IP Setup" item in the "Advanced" section of the left hand column of Figure 1 4. The result is the LAN IP configuration page shown in Figure 1 6. This configures the connection between your PC and the access point, and controls whether the access point acts as a DHCP server on the WLAN.
Figure 1-6 LAN IP Setup page of the wireless access point configuration site.
The top set of fields in Figure 1-6 specifies the IP (Internet Protocol) address of the wireless access point itself. Note that the default is 192.168.0.1, which is the same IP address we typed in our browser’s address bar to access the configuration pages. If you change this IP address in Figure 1 6 and click "Apply", you will have to type the newly specified IP address in your browser’s address bar to access the access point’s configuration pages. Changing the IP may be necessary if there is another device on your LAN that has the same IP address, as each IP address must be unique on a given network. By convention, the set of IP addresses starting with 192.168 (as in 192.168.0.1) and the set of IP addresses starting with 10 (as in 10.0.1.22) are reserved for local networks. Consult your network system administrator for advice on specifying the IP address of the wireless access point.
The next set of fields in Figure 1-6 specifies the IP subnet mask. The default is 255.255.255.0. The IP bits that have a corresponding subnet bit of 0 are free to vary, while the IP bits that have a corresponding subnet bit of 1 must match the specified IP address of the access point. In this case, only the last byte of the IP address can vary within the access point’s network. For example, valid IP addresses on the WLAN might include 192.168.0.50 or 192.168.0.200, while 192.168.1.50 would be invalid.
The "RIP Direction" and "RIP Version" fields retain their default values of "None" and "Disabled", respectively. RIP applies to larger networks of access points, and is beyond the scope of this document.
The next section of Figure 1-6 configures DHCP (Dynamic Host Configuration Protocol) which can automatically assign IP addresses to devices on the WLAN. By default, the WiFi Wildcard expects to be assigned its IP address by a DHCP server. If there is no other DHCP server available on the network, then the "Use Router as DHCP Server" item in Figure 1-6 should be checked. Note that there can be at most one DHCP server on any portion of the network. In Figure 1 6 the allowed IP addresses to be assigned by the access point are specified to be in the range 192.168.0.2 to 192.168.0.51. Note that these addresses fall within the IP and subnet specification in Figure 1-6.
The "Wireless Setup" page of the Netgear configuration site (in the "Advanced" section of the left hand column in Figure 1-4) simply has two check boxes, both enabled by default: "Enable Wireless Access Point" and "Enable SSID Broadcast". Both of these should remain checked in most applications.
The wireless access point configuration parameters specified in this section should enable wireless communications with a WiFi Wildcard that is in its default factory condition. Please work with your organization’s network administrator to customize the settings to the needs of your particular network topology.
Verifying WiFi Wildcard communications
Once you have configured your wireless access point to have an SSID of "WIFI_WILDCARD" (all upper case) with security disabled and the DHCP server enabled, you are ready to verify communications with the WiFi Wildcard in its default factory configuration. (If any of these settings are not compatible with your network topology, you can reconfigure the WiFi Wildcard wireless and security settings as described in later sections of this document).
To test the WiFi Wildcard, it must be powered up and attached to its antenna. Make sure that the WiFi Wildcard is properly mounted on the Wildcard bus, and power up the Mosaic controller board.
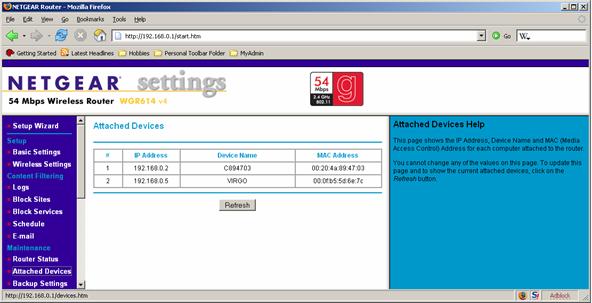
The access point must also be powered up. From the access point’s configuration home page shown in Figure 1 4, click on "Attached Devices" in the "Maintenance" section of the left hand column. You should see a screen similar to Figure 1-7. Each of the devices attached to the wireless access point is listed in a table specifying the device’s IP address, name, and MAC (Media Access Control) address. The MAC address of the WiFi Wildcard is printed on the Lantronix WiPort device. It contains twelve hex digits. You can match this MAC address to an entry in the table; in Figure 1-7 it is the first entry. The default name" that the Lantronix WiPort on the WiFi Wildcard reports comprises the letter "C" followed by the last 6 digits of its MAC address; this is displayed in the middle field of the first line of the table in Figure 1-7. The IP address of the WiFi Wildcard is listed in the first column of the table entry that has the MAC address equal to that printed on the WiPort.
Knowing the IP address assigned to the WiFi Wildcard is very important; it allows you to communicate with the Wildcard.
If you see an entry corresponding to the WiFi Wildcard’s MAC address in the "Attached Devices" page of your wireless access point, then you have successfully established communications with the WiFi Wildcard. If not, try power cycling the WiFi Wildcard and the access point, and verify that the SSID and security settings of the Wildcard match those of the access point.
Figure 1-7 Attached Devices page of the access point configuration site.
Using the Lantronix device installer to verify communications
An alternative way to verify communications with the WiFi Wildcard is to use the Lantronix Device Installer program. This approach also works for the EtherSmart Wildcard.
The Lantronix Device Installer is a small application that runs on your PC. It can be downloaded free of charge from the Lantronix web site at www.lantronix.com. Go to the
Support→ Downloads → WiPort G
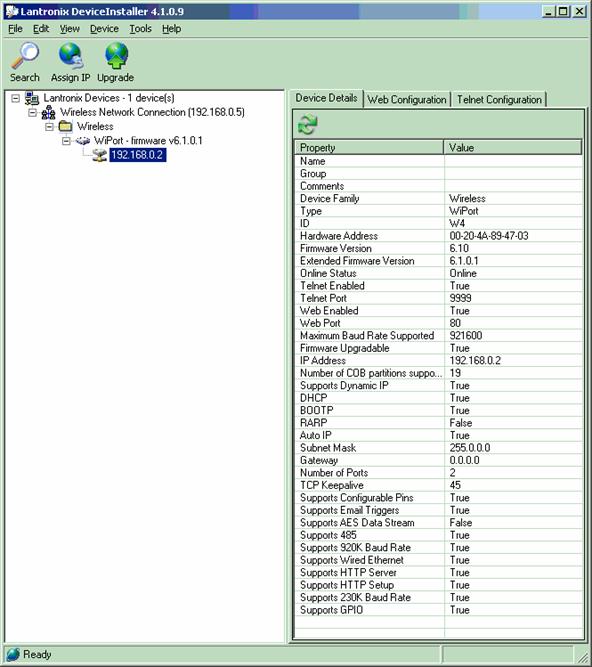
section of the Lantronix website and download and install the Device Installer (also known as a "configuration utility"). With the access point and the WiFi Wildcard powered up, double click on the Device Installer icon to start it. You should see a screen similar to Figure 1 8 . If not, power cycle the Wildcard and the access point, and activate the Device→ Search menu item to rescan the wireless network. If you still are having trouble, go to the Tools→ Options→ Network menu item and make sure that the "Wireless Network Connection" box is checked.
The Lantronix Device installer provides a list of the IP addresses of all Lantronix devices that are discovered on the specified LAN.
Note that the "Web Configuration" tab does not work with the EtherSmart/WiFi Wildcards, because Mosaic has changed the internal device configuration webserver port to 8000. You can access this website directly from your browser as described in the section titled "Using the Lantronix WiPort Configuration Webserver To Configure Security".
Figure 1-8 Screen shot of Lantronix Device Installer showing the IP address and configuration settings of the WiFi Wildcard.
See also → Installing and Using Your WiFi Wildcard
WiFi Configuration and Security
WiFi Wildcard Hardware Schematics
WiFi Compatible Controllers
See also → WiFi Access Point Configuration

